/callout
This post is part three of the No-Code 101 series, a straightforward guide to help non-technical solopreneurs and consultants build powerful automations without learning to code.
Your Business Is a Road Trip
Imagine your business as a road trip across the country. You've packed your essentials (your data) in a suitcase (JSON, remember that from the last lesson?).


Now you need to decide which roads to take.
That's exactly what control flow is in your automations—the system of roads, intersections, and traffic signals that guide your data from start to finish.
The Automation Highway System
On our business road trip, your data needs to travel from one destination (node) to another along specific routes (edges). This is why node-based thinking is important. If you’re not familiar with it, start here:
 David Szabo-Stuban
But unlike a straight highway from New York to LA, your business processes have decision points:
- Some clients need the VIP route
- Some inquiries require detours to your support team
- Some processes need to loop through multiple stops before continuing
In both programming and no-code tools like n8n, control flow gives you the power to build these decision points without writing code. Some have limited control flow options (like Make) and others have nearly identical to programming but without feeling like you’re hacking the Matrix (like n8n).
Conditional Paths - Traffic Lights
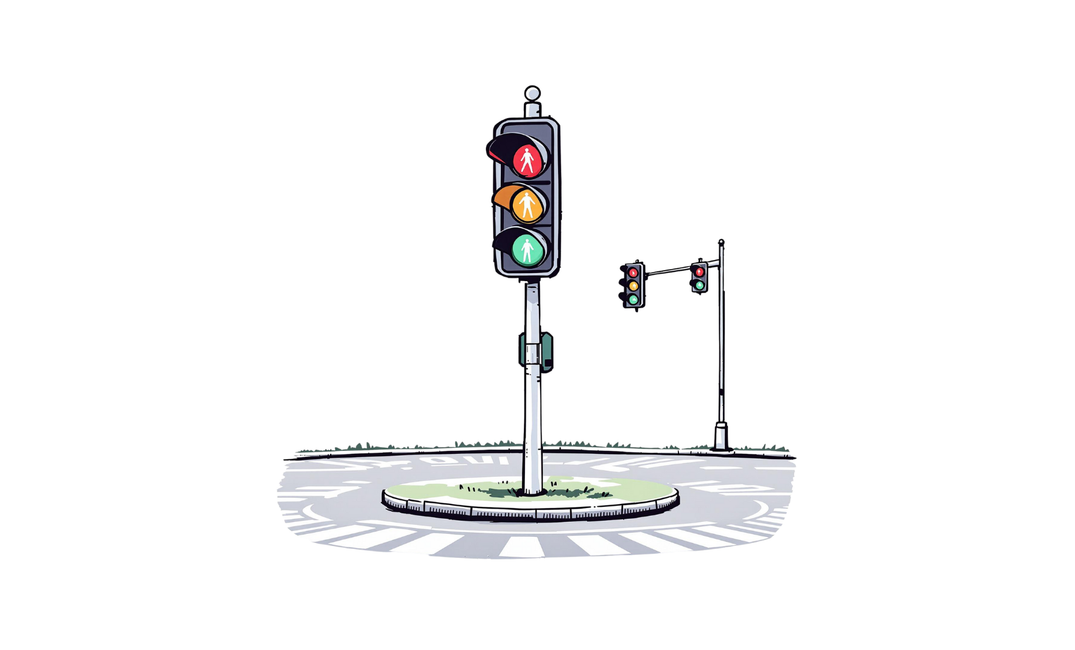
The most basic control flow tool is the IF Node—your automation's traffic light.
🚦 IF Node: The Traffic LightJust like a traffic light that says "if the light is green, go; if it's red, stop," an IF Node makes simple yes/no decisions for your data.
Real Example: Client Intake Sorting
Let's say you receive new client inquiries through a form. Each submission creates a JSON "suitcase" like this:
{
  "client_name": "Alex Kim",
  "company_size": "1-10",
  "budget": "$5,000",
  "project_type": "website redesign",
  "timeline": "urgent"
}
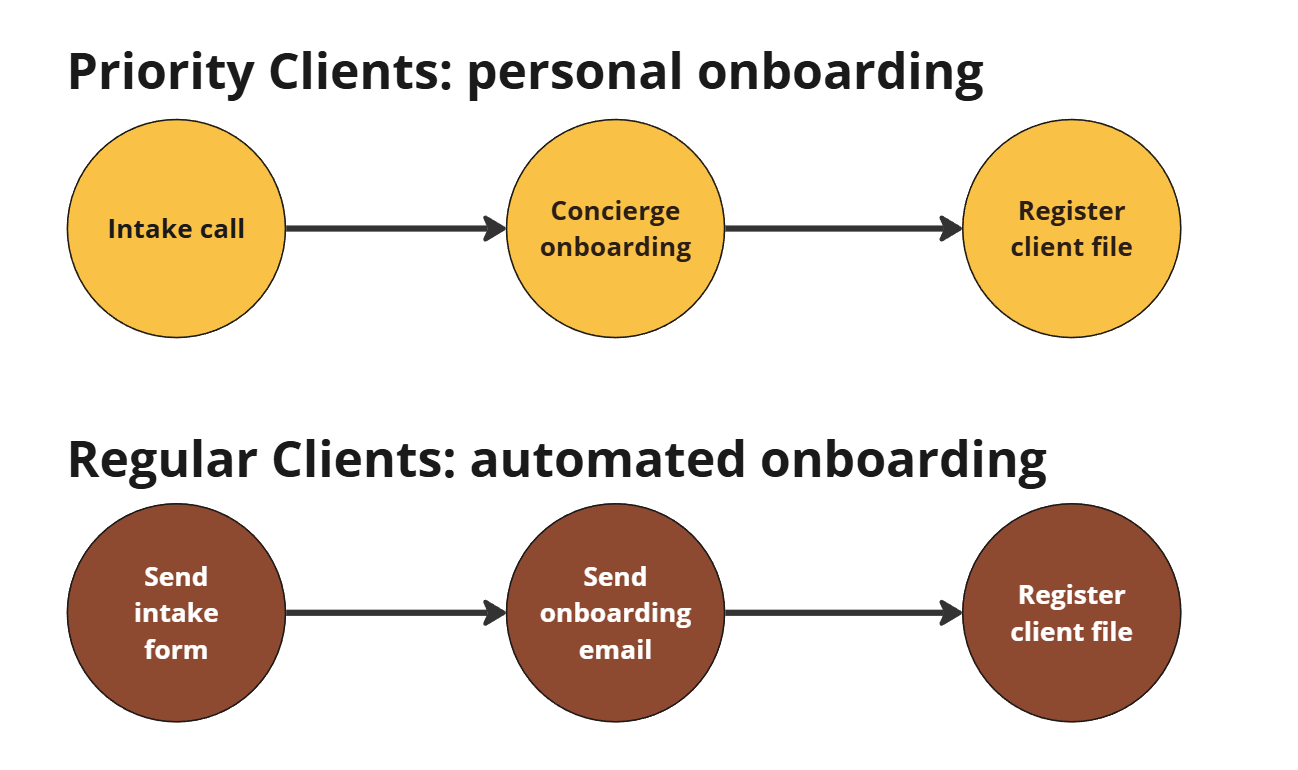
Let’s say you have two workflows set up already. One that processes regular clients and one that processes priority clients.
Here's how you'd use an IF Node to direct this data:
Connect your form node to an IF Node
Set the condition:
{{$json.timeline === "urgent"}}1Connect the "true" path to your "Priority Response" node
Connect the "false" path to your "Standard Process" node
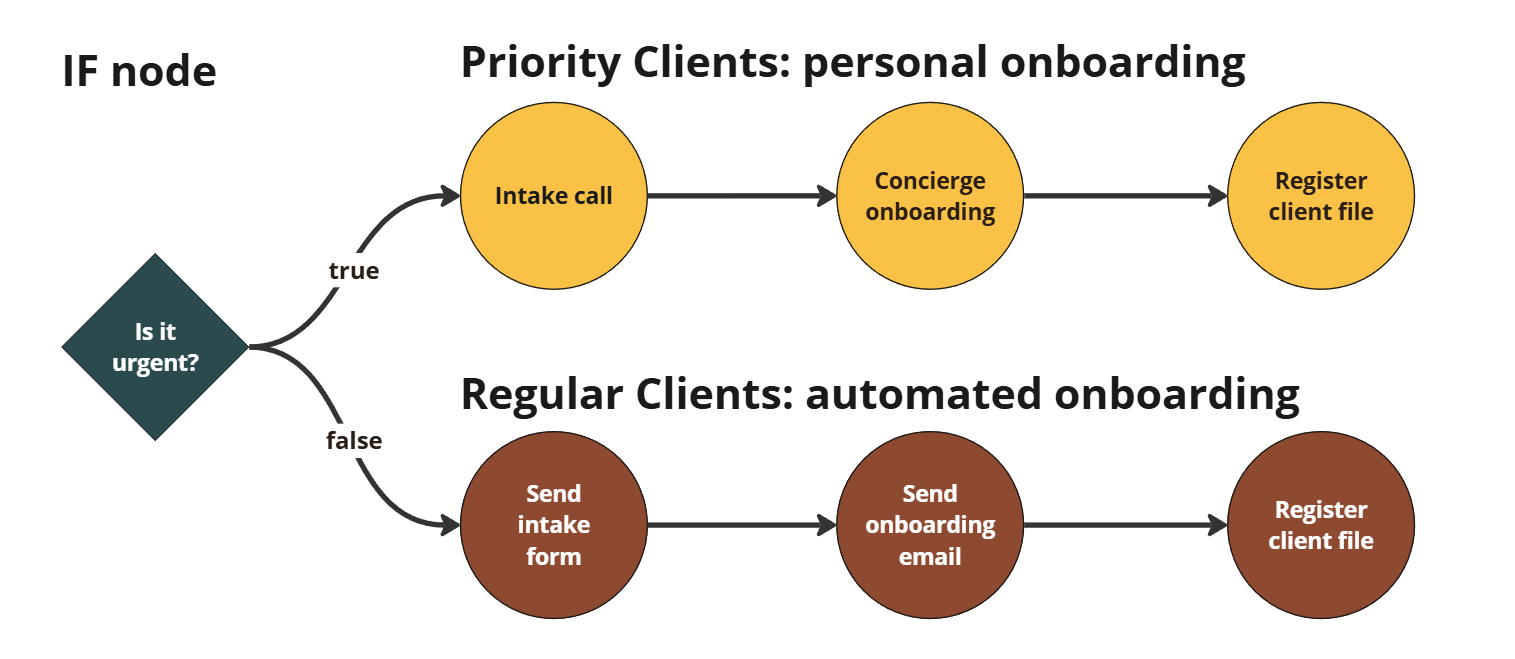
Now your workflow automatically sorts clients based on urgency—no manual checking required!
Conditional Paths - Interchanges
Sometimes a simple yes/no decision isn't enough. What if you need to route clients based on both timeline AND budget?
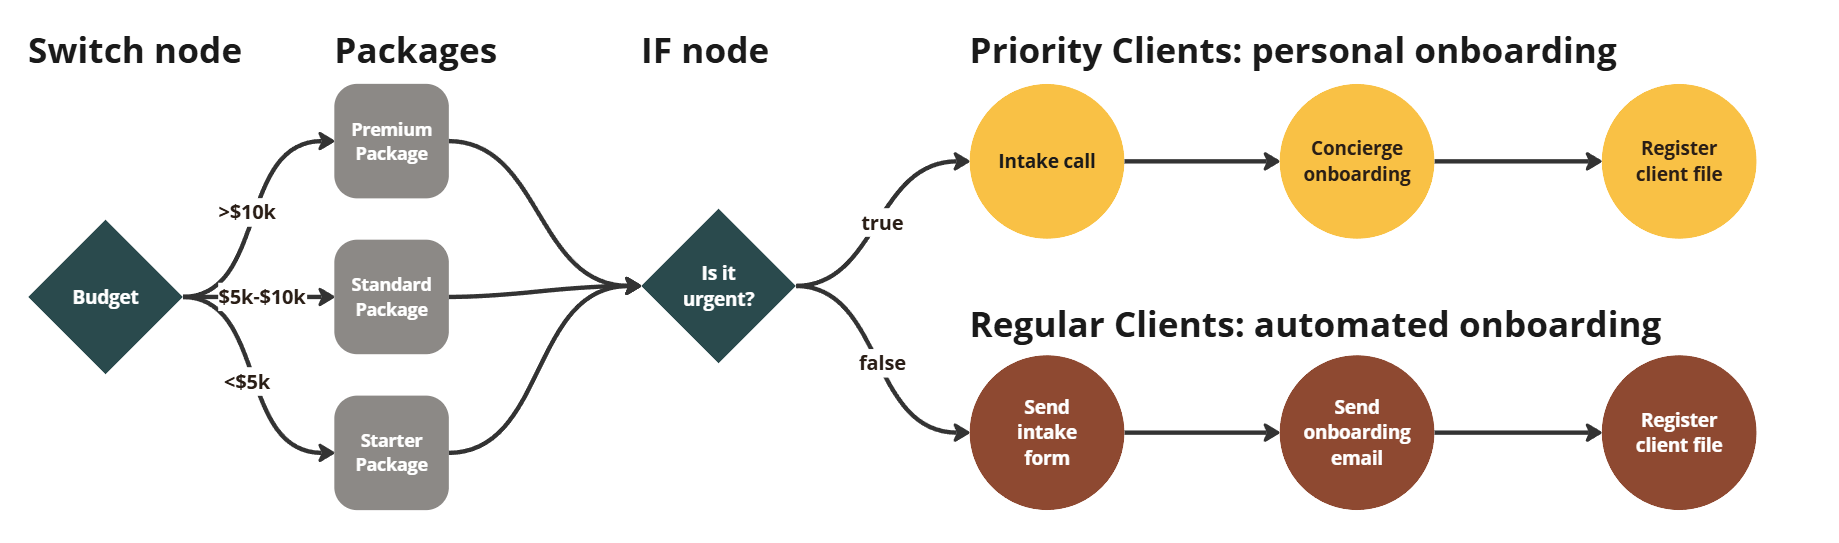
Enter the Switch Node—like a highway interchange with multiple exits.
🔄 Switch Node: The Highway InterchangeReal Example: Service Package Routing
{
  "client_name": "Taylor Jordan",
  "budget": "$15,000",
  "project_type": "full marketing campaign"
}
Let’s say you have multiple packages and you already know the budget. With a Switch Node, you can create multiple paths, assigning the right path to the client:
- If budget > $10k → Premium Package workflow
- If budget $5k-$10k → Standard Package workflow
- If budget < $5k → Starter Package workflow
In n8n, this looks like:
- Add a Switch Node after your intake form
- Create 3 conditions for each budget tier
- Connect each "output" to different service package workflows
Now your client gets automatically routed to the right service level without you lifting a finger!
Rest Stops: Handling Lists of Items
Sometimes your road trip requires stopping multiple times along the same route. Maybe you need to process each item in an order, or send individual emails to every member of a team.
That's where the Loop Nodes come in—they're the rest stops that let you handle each item one by one.
🔁 Loop Nodes: The Rest Stops
Real Example: Processing multiple applications
Let’s say that you run an agency and you sell your services via a live webinar. This means that ideally you have 5-10 customers signing up at the end of your event. You can just send them an application form and run the above flow for every participants, but that means you’d need to start and stop the workflow for every person, slowing the process significantly.
Let’s see what we want to do. When someone signs up, we want them to
- Fill an application form
- Assign package based on budget
- Assign priority based on urgency
- Invite them to the relevant group on your client portal
Your JSON might look like:
{
  "customer": {
    "name": "Jamie Smith",
    "email": "jamie@lumberjack.so"
  },
  "service": {
    "budget": "10000",
    "urgency": "urgent"
  }
}
When you send multiple items to a loop, n8n will handle that without any extra steps. But if you need to download the data from a spreadsheet first, you need to split them into separate items.
Here's how to process this with Loop Nodes:
- Use a "Split In Batches" node to separate the modules array
- Process each module individually (grant access, send email)
- Use a "Merge" node to combine everything when done
Once the loop is done, it will forward only one item. However if you need let’s say create a new spreadsheet with a full report of all people that were processed, you’d want to Merge the data first and then create the spreadsheet.
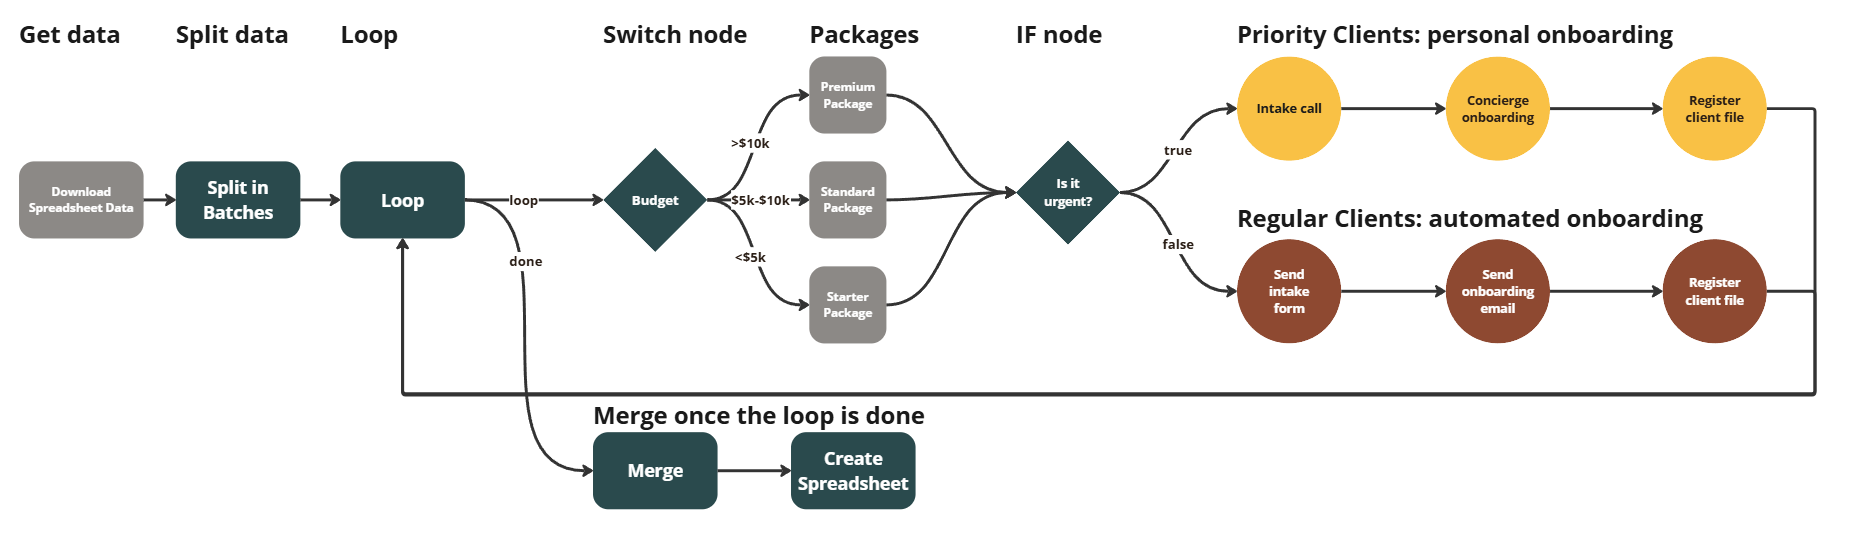
Now each module gets processed correctly, and your customer gets a smooth onboarding experience!
Roadside Assistance: Error Handling
Every road trip encounters unexpected problems—flat tires, wrong turns, or bad weather. Your automation needs backup plans too.
That's where Error Handling comes in—your workflow's roadside assistance.
🛠️ Error Handling: Roadside Assistance
Real Example: Backup for No Budget
When your clients sign up, they might forget to fill out the budget part or they might give you badly formatted responses. This would create an error in n8n but luckily you can handle that in multiple ways. In the node’s “Settings” you can use the following:
- Retry on Fail: this will attempt to run the node again when an error happens.
- On Error: Continue (using error output): This will add a new output to your node called “Error” and you can build the process there.
Let’s see that in our example.
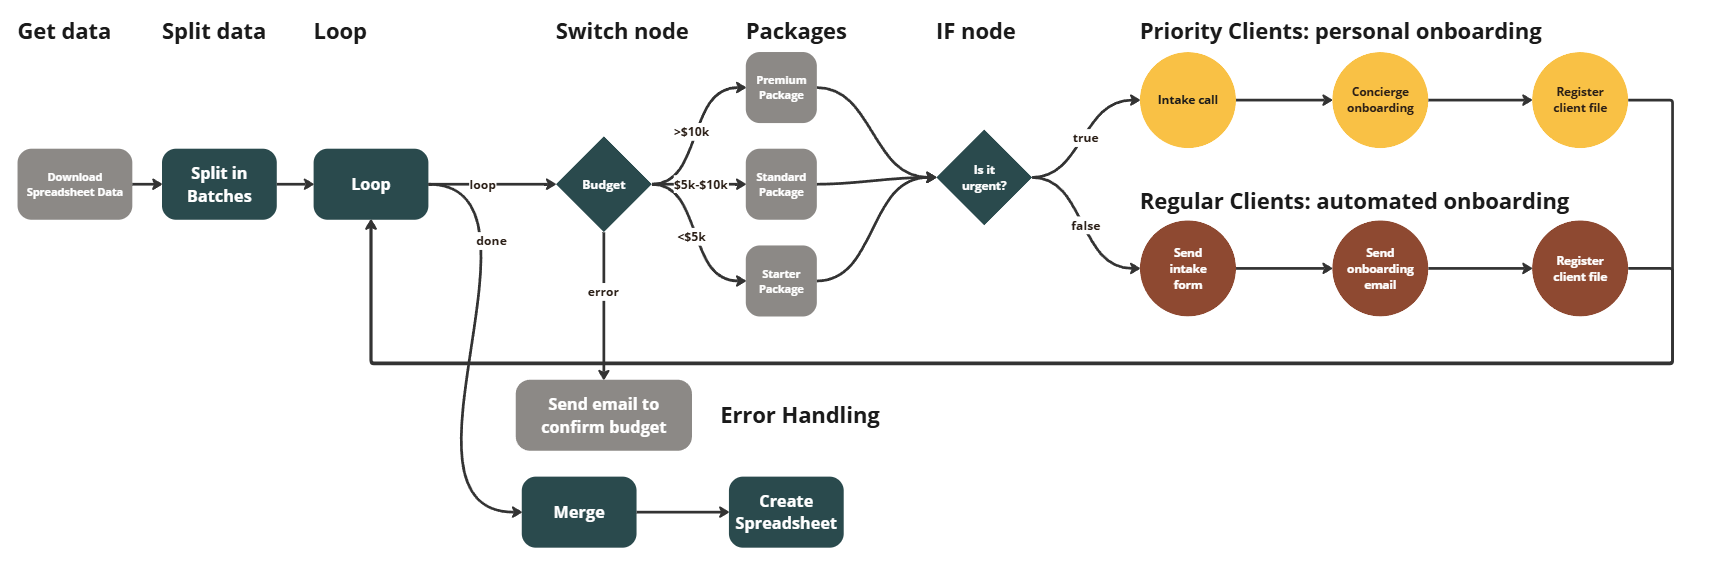
This ensures you know immediately when something goes wrong, and your automation can recover gracefully.
Putting it all together
The skeleton of our automation is ready, but we still need to determine the input and the output. When you’re building an automation, this usually is the only thing you know at first.
In our case, let’s say we want to run our automation every morning at 9am. This means that we’re going to create a time-based trigger (as opposed to an action-based one). Time based triggers automatically run at set intervals, while action-based triggers will only run when the defined action happens.
Lastly, set our output step as sending a Slack notification about the spreadsheet report we just created so the team knows what’s up.
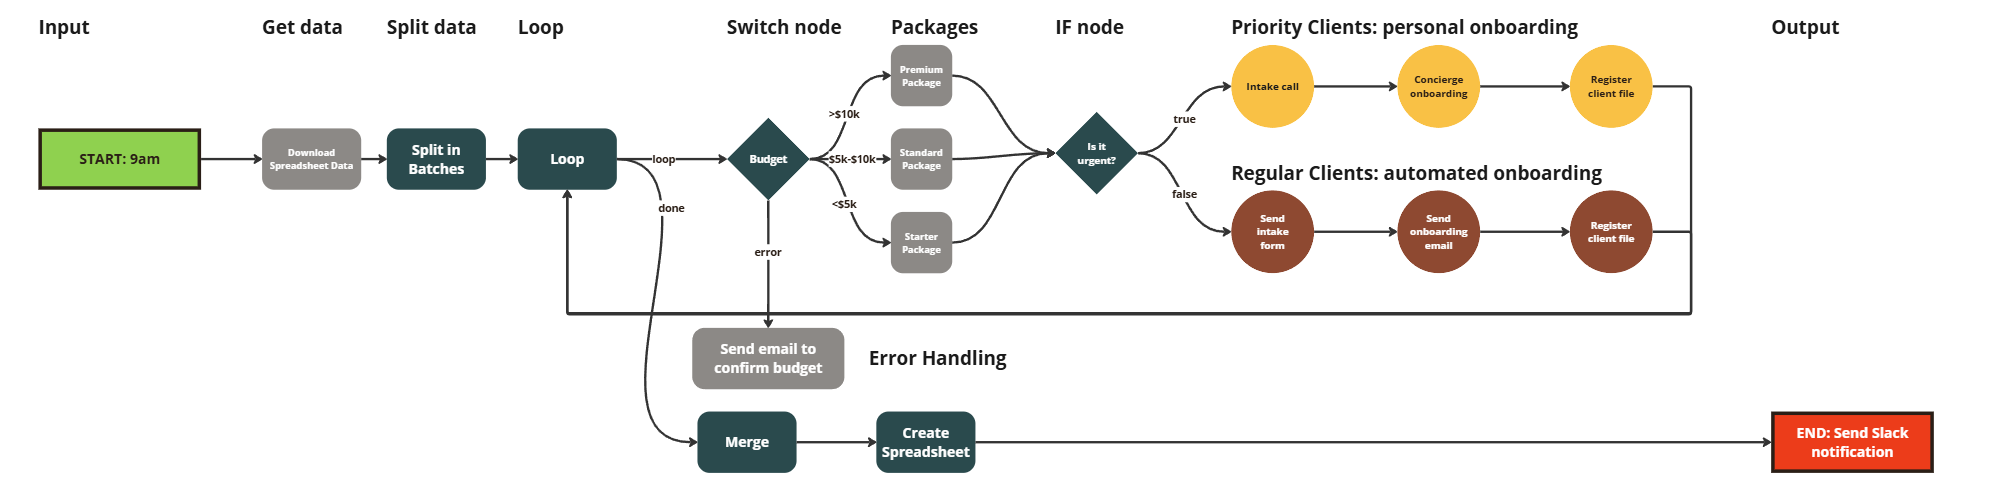
There you have it. We went from a simple use case, expanded it to cover most elements of the control flow and built a full automation. This is not an exhausting list but this is the only thing you need to know to get started.
I also created a simple animation for you as a Claude artifact to visualize this:
Using AI to Navigate Complex Routes
Remember how we used GPT-4o-mini to help with JSON in our previous article?
You can do the same for control flow!
When you're not sure how to structure a complex decision tree, let AI act as your tech advisor:
- Open ChatGPT or Claude
- Describe your workflow goals and decision points.
- Ask it to design the control flow structure
- Implement the suggestions in n8n
Pro tip: If you ask for a Mermaid chart, Claude will not just explain but also visualize this for you.
Example prompt:
I'm building an n8n workflow to qualify sales leads. I need to route leads based on:

- Budget (under $5k, $5-25k, $25k+)
- Urgency: (urgent or not urgent)

High priority leads are those that marked "urgent" in the lead form.
Everything else is low priority.

If the budget is under $5k, assign the Starter Package.
If the budget is $5k-$10k, assign the Standard Package.
If the budget is $10k+, assign the Premium Package.

If it's a high priority client, do the following steps: intake call, concierge onboarding, register client file.
If it's a low priority client, do the following steps: send intake form, send onboarding email, register client file.

Help me design the control flow for this workflow. Create a Mermaid visualization of the flow.
Claude will think through the logic and generate the basic flow for you. Then if it’s too complicated you can ask it to keep refining until you’re happy with the results.
Important: You should only start building something once you’ve done this step!
TL;DR for Non-Developers
Control Flow = GPS
- IF Nodes: Simple yes/no traffic lights for your data
- Switch Nodes: Highway interchanges with multiple exits based on conditions
- Loop Nodes: Rest stops for processing multiple items one by one
- Error Handling: Roadside assistance when things break down
Quick Start Guide:
- Map out the decisions your workflow needs to make
- Choose the right control flow tool for each decision
- Connect your nodes with the appropriate paths
- Test with sample data before going live
- Add error handling to key points
Your First Control Flow Challenge
Ready to try this yourself? Here's a simple exercise:
Create a workflow that sorts incoming emails into folders based on:
- If it contains "urgent" in the subject → Urgent folder
- If it's from a client email address → Client folder
- Everything else → General folder
Use an IF node for the "urgent" check, and then a Switch node for the remaining routing.
Need More Help?
I built a simple custom GPT tutor that will help you understand control flow better. If you get stuck you can also use this GPT to help you draft your flow.
You can try it here, it’s free.
Next week I’ll show you how to connect your automated workflows to other apps using APIs—without writing a single line of code.
Actual expression might vary, but if you copypaste this in and it doesn’t work, just take a screenshot and send it to Claude/ChatGPT to debug. ↩